Preparation
Before compensating the nut, and after setting neck relief, saddle height, and nut height as well as possible, and a buzz check has been done, it’s a good idea to test the amount of intonation error at the nut. Note the cents sharp or flat for each string. This will give you some idea of how much adjustment is going to be needed on each string, before making any alterations.
It is important to be able to accurately measure the cents-off when comparing any two notes. See Measuring the Intonation Difference Between Two notes.
Nut compensation is done by comparing and adjusting the edge of the nut for the open string to be in tune with fret 2 or fret 3. (I don’t use fret 1, because of its proximity to the extra height of the nut slots, compared to the fret tops.)
When nut compensation is completed, and if compensation at the saddle is perfect, then the open string note will also be in tune with the 12th or 14th fret (However, if there is any error, it’s usually more important that the open string be in tune with the lower frets, than with the 12th.)
The amount of compensation needed at the nut depends on string size and action height, but it also depends on the actual position of the nut on any particular guitar – I find that the nut positions do differ on some guitars, perhaps intentionally, to reduce sharping of some strings, at a cost of flatting others!
Working on several guitars with medium low action, trial and error resulted in offsets of up to .1” at the 6th string and up to .04 at the 2nd string. Guitars with the nut placed slightly closer to the first fret needed less compensation for sharpness on some of the strings, while other strings were already slightly overcompensated, and the nut slots needed to be filed back.
It’s possible, but rare that a nut is placed too far from the first fret, requiring more than usual compensation or trimming of the fret board, or that the nut is pushed backward from the fret board by debris or excess glue.
Before doing any work on the nut, it’s best to try to get an idea of how much compensation will be needed, by the use of an acurate tuner. See Tuners and Tuning.
Electric guitars usually have an unwound third string – the unwound string needs more compensation than a wound third – about as much as the 6th. Likewise, classic guitars have a fat unwound third. and the wound strings have a stranded nylon core, making them very flexible, therefore needing less compensation. The third string and sixth require the most compensation and the other strings may require very little.
People are understandably reluctant to do anything that would alter the appearance of a guitar, so that may be an important factor in selection of a compensation method.
For final string height adjustment at the nut, I prefer a method, which sets the nut string height only slightly above the plane of the fret tops, providing clean, close action, with no buzz.
Press the string down at the first fret and measure, with a feeler gauge, the string gap above the second fret. Use this measurement to set the string height above the first fret, adding .001” – .002” to allow for wear.
Nut Compensation Methods
In the methods that follow, I write about filing the nut back when a string is overcompensated by the forward location of the nut. This can be done by filing a facet on the front edge of the nut, while minimizing the height of the cut, similar to how the saddle is often faceted.
Bone Strips Method
Stephen Delft aptly describes using strips of material to compensate each string separately. This is a good method, especially when experimenting, and when there is high action, for example a setup for playing slide.
This method can be found at: https://www.mimf.com/nutcomp/. Delft also describes a method of checking out the accuracy of the entire fret board. Notice that this article was written in 1992; Delft was a pioneer! So, nut compensation is not new – just mostly ignored!
Shelf Nut Method
When compensation is needed for all the strings, I prefer to make a shelf-nut, by adding a continuous strip (shelf) to the original nut, rather than adding an individual strip per string.
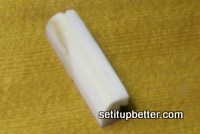
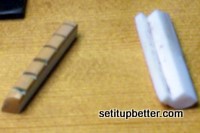 To make it, start with a piece of bone a little more than 1/16” wide by about 3/16” high by about 2 ¼” long (The oversize facilitates handling). Cut a slight arch in the bottom edge and sand to match the radius of the fret board by laying sandpaper on the fret board. Then cut it to a bit over length and maybe take a little more material off the top, still leaving enough height to hold onto while gluing it to the original or new nut.
Now the tricky part: super-glue the shelf to the nut. Coat the end of the fret board with fret board oil or mineral oil, to prevent gluing the nut or the shelf to the fret board. Be sure to use enough superglue on both surfaces, because there is not much common area of the two pieces for the glue to hold (the finished shelf will be very thin). Don’t wait too long to carefully remove the nut from the fret board. After the superglue is dry, I like to add more superglue to the joint, especially if the original nut has been rounded on the top edge.
Then file or sand the excess material off the shelf to match the height and width of the nut, sloping upward. You can file back some of the width of the shelf that you think you will not need on the smaller-cored strings. With experience, you will know about how much to take off.
Continue the original slots through the new shelf. Considering the added length of the slots, try not to make the angle of the slot too great; my guess is that an angle of about 8° is good.
 ring height will need to be adjusted downward because of the up-slope of the groove in the shelf, however, remember that you will be filing off the width of the shelf for most of the strings, which will also lower the height at the edge of the shelf. You will need to coordinate your final height adjustments with your final shelf-width adjustments (not so difficult, but requires care and patience).
Begin making measurements and adjustments. For each round of trial adjustments, I test the intonation of all the strings and note the error amounts before removing the nut to make more adjustments. That saves frequent loosing and re-tightening of the strings. The strings need to be at full tension for testing, because tension effects intonation. Use care to loosen the strings only the minimum needed to remove the nut – otherwise, strings are inclined to break, from repetition, at the tuning machines.
Partial shelf Nut Method
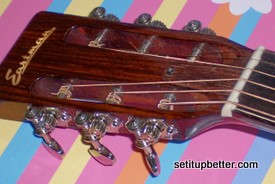 When the width of the first fret space is less than its calculated width, some of the strings will not need a shelf. I make partial shelves as needed. Some strings are already overcompensated by the original nut, likely the first and the smallest wound string, and maybe more. File the original nut back a bit. File at a slope, or use a small Dremel grinder horizontally, to carefully produce a “hollow grind” in order to retain a more vertical edge at the top of the shelf.
Move The Nut Forward Method
It is somewhat easy, especially for builders, to move the nut forward. For electric and classical guitars, the nut could be moved up enough to compensate the third and sixth strings, and then, file back the top front of the nut for the other strings that would be over-compensated. For steel-string acoustic guitars, moving straight forward would be alright, but moving forward at a slight slant, to compensate the second and sixth, would be an option. Then, file back the nut, as needed, for overcompensated 5th, 4th, 3rd, and 1st strings.

It should be noted that if the nut is moved forward, without compensating the individual strings, the notes on the lower frets will be less sharp, and on average will be more in tune to the equal temperament scale. However, some of the strings will likely be overcompensated, and others will be under-compensated. The fretted strings will diverge from each other by the same amount as before. The smallest wound (overcompensated) string played against the largest unwound (under-compensated) string will still not sound so good. A closed chord will sound the same as before (only not as sharp). Chords with open strings should sound better than before. These effects can be mitigated with tuning offsets; the Buzz Feiten System is an example of this.
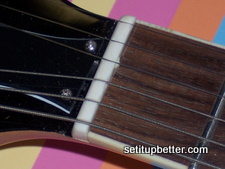
On this inexpensive “Les Paul”, I moved the nut forward at a slant, to compensate the 2nd and 6th strings, and then I filed the nut back for the overcompensated strings (1st and 4th, and maybe 5th). It would have been finished if this were an acoustic guitar, but it has an unwound 3rd, so I added a small shelf for the 3rd string. This guitar, with upgraded bridge and pickups, plays and sounds better than some guitars costing a lot more!
One-Peice Shelf Nut Blank from setitupbetter
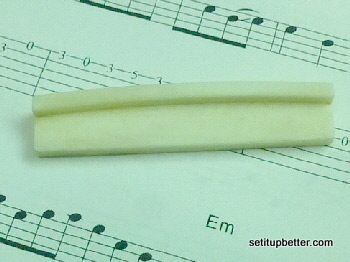 Available to fit an assortment of fret board radii, this oversize bone blank will have a shelf already cut to fit your guitar’s fret board radius. Compensation offsets can be adjusted to any guitar by filing the shelf back the needed amount for each string! Available in bleached or unbleached bone. See a one-piece nut blank fitted and installed on a guitar.
(Because of age, I have retired from making One-piece bone shelf-nuts, I have a few left over for sale. (I am searching for another source of shelf-nuts to suggest to readers.)
